Last updated on May 21st, 2021 at 07:27 am.

0. Vultr Tutorial – Download ZIP File with code snippets
1. Download Vultr Tutorial Setup PDF
2. How to create a Swap File in Centos 7
4. Vesta – Update PHP 5.6 to 7.2
VULTR Tutorial – How to Set up and deploy CentOS 7 for Putty Users on Windows

In this guide I will be using Vultr as my VPS of choice. Vultr is an amazing Cloud Server provider, a great alternative to Linode and Digital Ocean. Check out all their offers and pricing here.
In this guide what we’ll do include:
- Create an Account on Vultr and load it up with credit
- Deploy a first Server with CentOS 7
- Setup CentOS 7 with new user, Firewall and more, all while using Putty on Windows.
- Enable CentOS Auto Updates for security updates
Note that these steps can be used on any VPS, once you install your CentOS 7 server.
Get a VPS Account on Vultr

Go to Vultr.com and set up your account.
Then load your account with some credit. As soon as you create your account you need to make a payment to load your account with credit. Supported payment options are:
- Credit Card
- PayPal
- BItcoin
- Alipay
Related : Debian 10 Initial Server Setup on a VPS
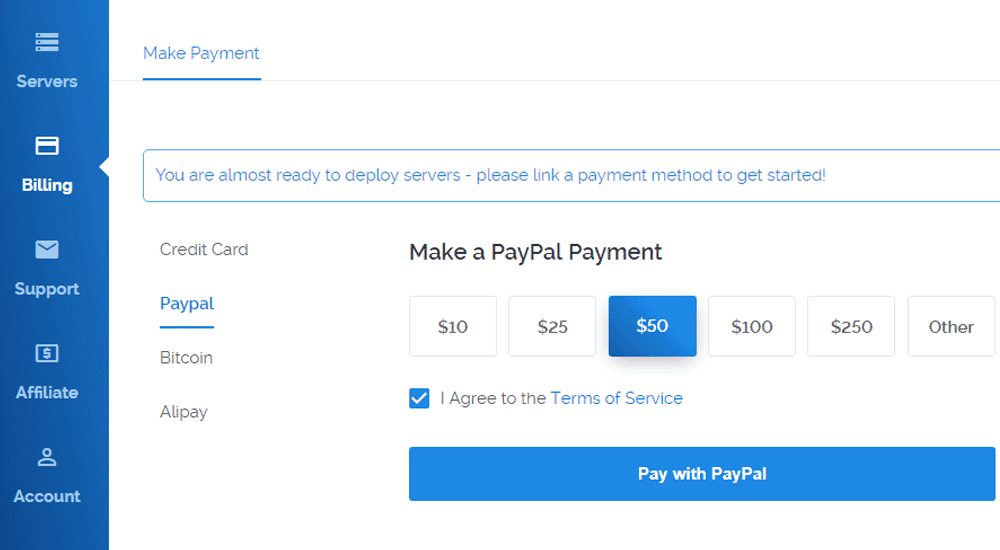
Choose the amount to pay and the method of payment, agree to Terms and Conditions and then click on the Pay with button. Finish the transaction. After which you will be able to deploy a server on Vultr.
Once you have some credit on your account you can now launch a server.
Read : How to Run WordPress on a VPS – Free tutorial on YouTube.
Launch a Server / Spin up / Deploy a server on Vultr
On the top right of your screen click on the blue plus ( + ) button to deploy a new server.
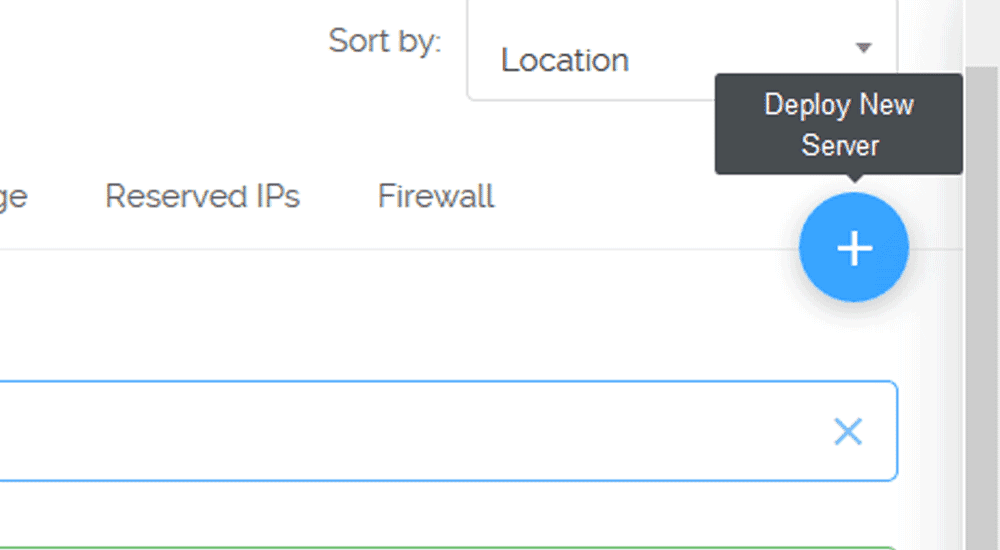
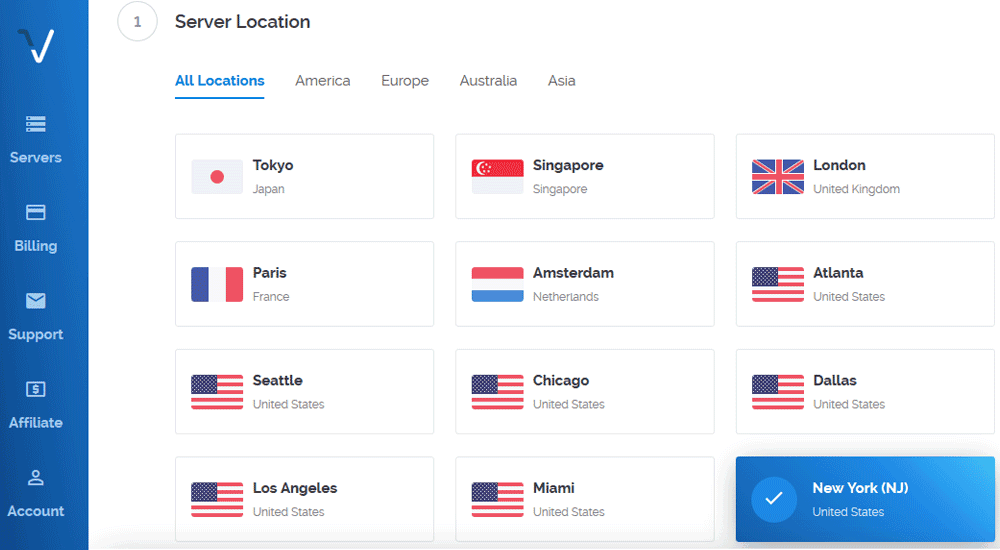
Next Choose your preferred server location. Choose any location, however one closest to where your web visitors are located is best.
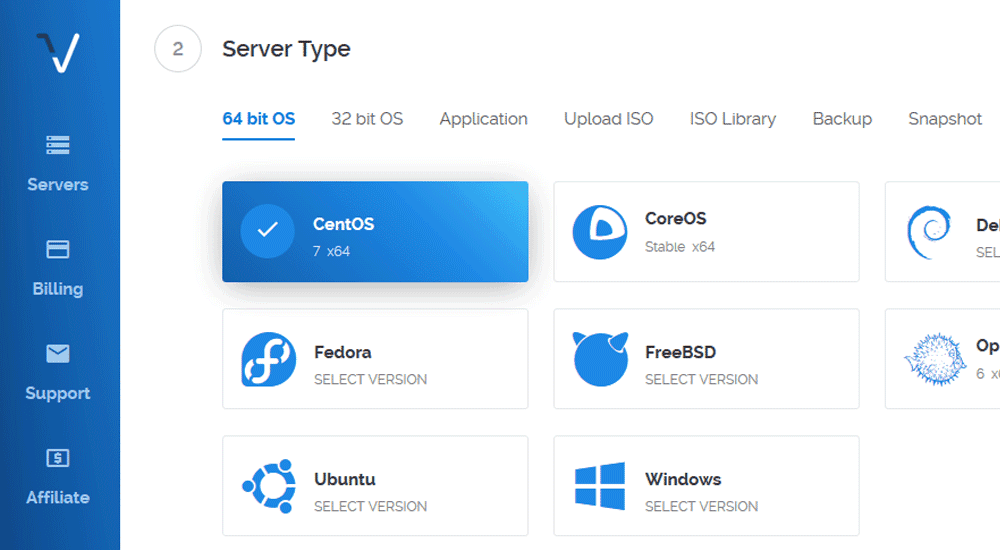
Next, scroll down and choose the server type. This is the Server OS that will be installed on your deployed Server instance. In my case, I will choose CentOS 7 , the 64 bit version. If you will be following along with me I suggest you choose the same.
Then scroll down and choose your server size. This is billed hourly/monthly so choose the resources that best fit your server needs. You may choose any of the servers.
Please note that certain server Sizes are not available in certain regions. Feel free to switch regions. Since I’ll be destroying this Server as soon as I’m done with this setup guide, I don’t have a preference for location or size. I will choose any server size…

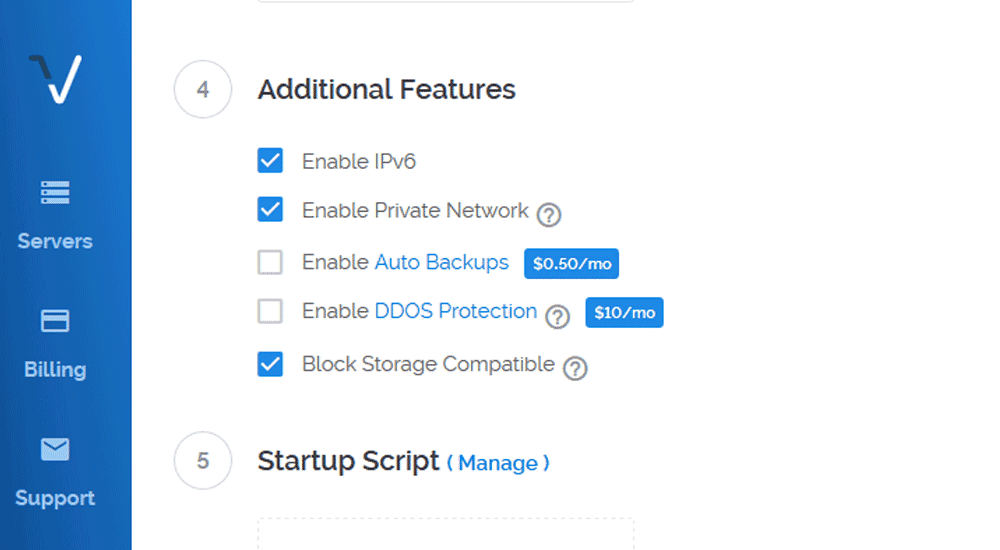
Under additional features I will check all the unpaid options as shown below.
Then, leave Startup script and SSH keys as is for now. We’ll create SSH keys using Puttygen and add it to our server later on.

Put in your Server Hostname and Label . Give a name based on the domain you want to use with it. Any subdomain name should do. Let it be some domain you own because if you will be hosting a website on it, you will need to add DNS records and match it with your Vultr account IP.
When all is done click Deploy Now.
Give it time to deploy and install.
The next part involves initial Server set up for CentOS 7. Since we’ll be using windows, you will need:
Putty / Puttygen : You can download and install them separately or you can choose the option that comes bundled with everything. Putty is free – Download Putty .
Putty will be for running our commands on our server. Puttygen will be for generating our SSH keys. SSH will enable us to login into our Server later on once we disable password login (For security reasons.)
Download and install putty and puttygen.
Initial Server Setup on Vultr – CentOS 7
The following is an adaption from the Vultr guide. I have adapted the guide to suite beginner Windows Users who would have definitely gotten stuck at some point during the user set up and root user deactivation.
Log into your new Server using putty
By now you should have installed both Putty and Puttygen.
In this first part we’ll use Putty. Actually we’ll use it throughout. We’ll only use Puttygen once, we’ll use it to generate our Public and Private SSH keys .That will come later.
Let’s log into our Server…
First you will need to locate your server password on Vultr as directed below. Note that this steps can be used on any VPS as long as you have installed CentOS 7 and you have your password and other credentials.
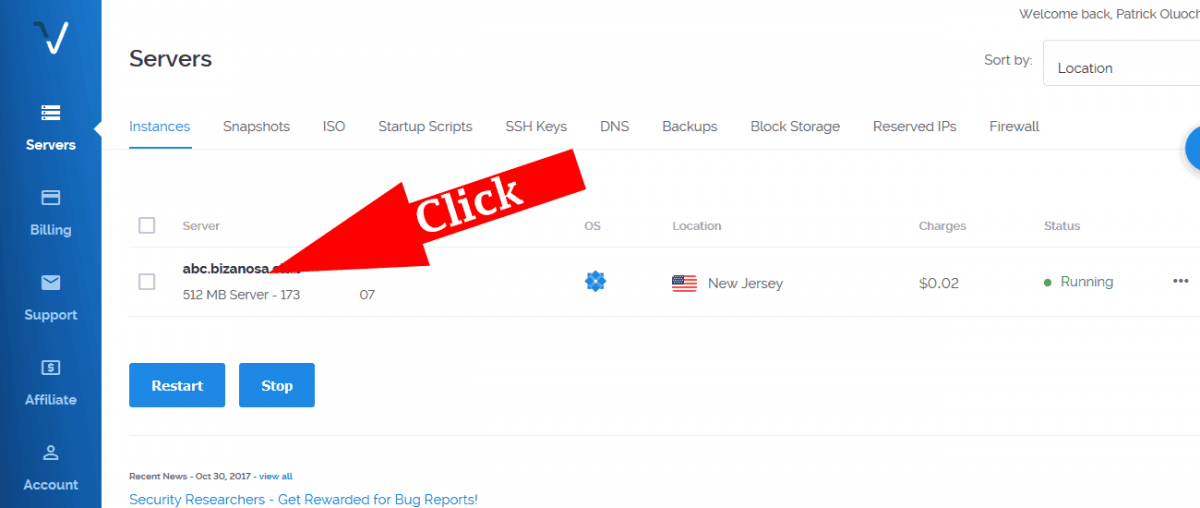
Click on the Server you have just deployed. This will take you to the Sever management window where your password and other server details are. Ensure your server is running before you do this. Running Status will be indicated in green as is in the screenshot below…
You will see your password, username and other details about your server. By default the username is root and the password is provided too. Just click on the copy icon to copy your password.
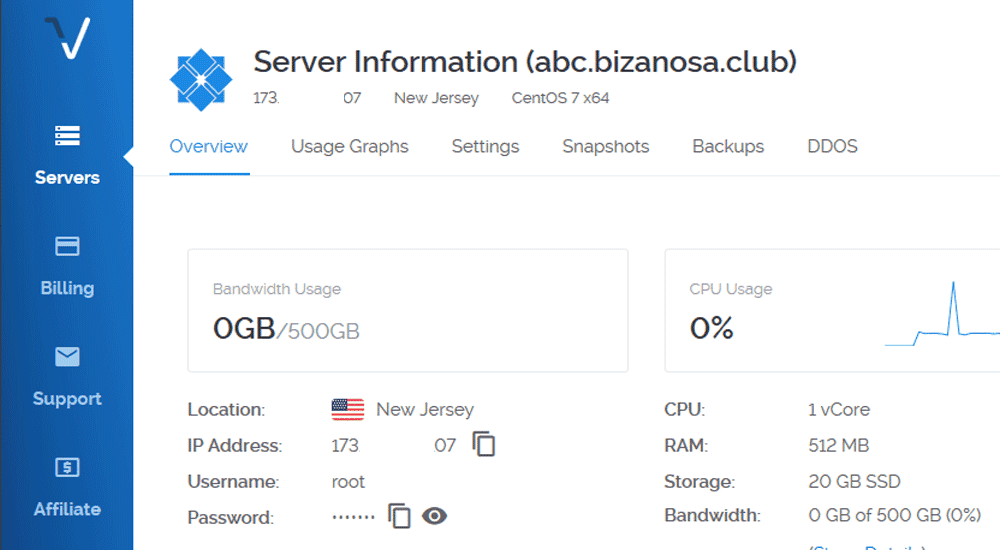
Now we can go ahead and log in. To login you will need:
- Putty – Already installed
- Username – Username by default is root
- Password – Copy it from your Server management dashboard (visible from the screenshot above).
Open Putty . If you are on Windows 8 and above, just search ( Windows Key + W) for Putty and open it.
Then Add your IP address under Hostname (or IP ).
Save the session so that you don’t have to type your IP every time. To do that, give the session a name under saved sessions.
Then click save. To save the session.
Do all the above as marked in the screenshot below.
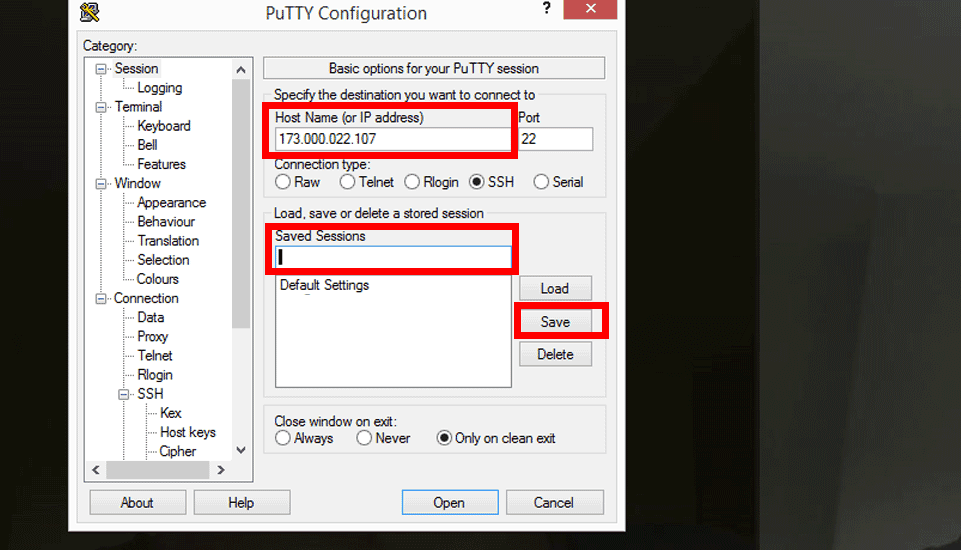
Now every time you want to login you will just double click on the session you stored. Then put in your username and password on the putty command window.
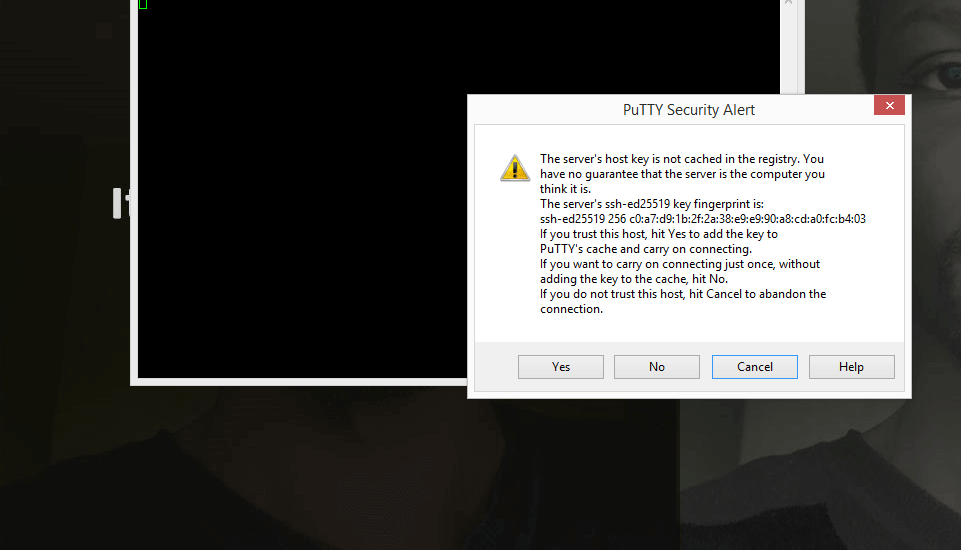
Double click on your newly stored session now. A prompt will appear as shown below. Click yes.
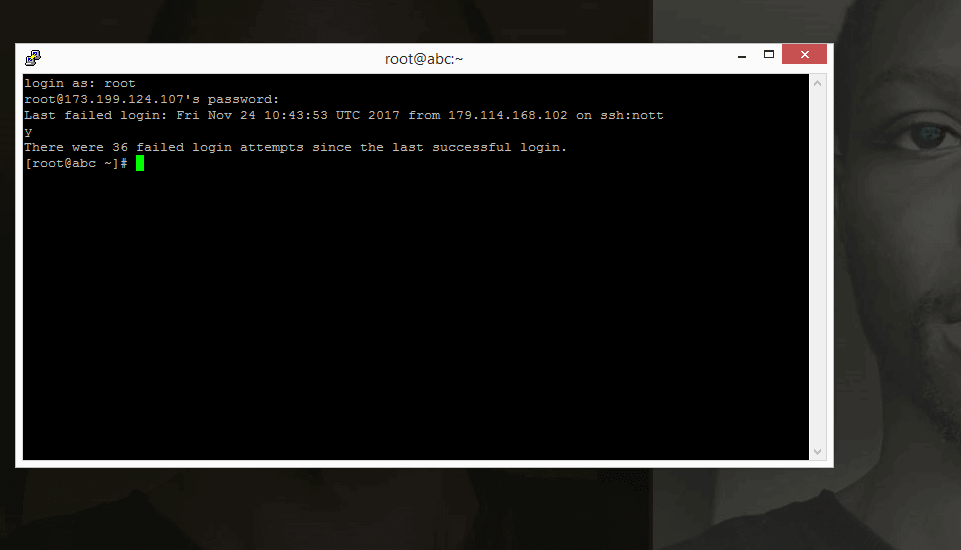
Then enter username of root. (Login as : root)
Then copy your password from your dashboard. Then right click once to paste it into Putty. While inputting the password, you will not see any output. Just press enter to log in.
Tip: To paste anything into putty, just right click once.
Congratulations you are now logged into your server and we can begin setting things up.
The following steps are adapted from the Vultr Centos 7 setup guide.
Step 1: Create a Standard User Account
For security reasons, it is not advisable to be performing daily computing tasks using the root account. Instead, it is recommended to create a standard user account that will be using sudo to gain administrative privileges. For this tutorial, assume that we’re creating a user named joe. To create the user account, type:
adduser joe
Set a password for the new user. You’ll be prompted to input and confirm a password.
passwd joe
Add the new user to the wheel group so that it can assume root privileges using sudo.
gpasswd -a joe wheel
#!#!#!#!#!#!#!#!#!#
The following steps will not work seamlessly for you on Windows. Scroll down to Go to the section of : Windows Solution
Read : How to Run WordPress on a VPS – Free tutorial on YouTube.
#!#!#!#!#!#!#!#!#!#

Finally, open another terminal on your local machine and use the following command to add your SSH key to the new user’s home directory on the remote server. You will be prompted to authenticate before the SSH key is installed.
ssh-copy-id joe@server-ip-address
#!#!#!#!#!#!#!#!#!#
End of Will Not work on Windows.
#!#!#!#!#!#!#!#!#!#
Windows Solution : Adding SSH Keys to your Server
First of all, we need to generate SSH Keys.
You have installed Puttygen. Open it up. We are going to generate public and private SSH keys.
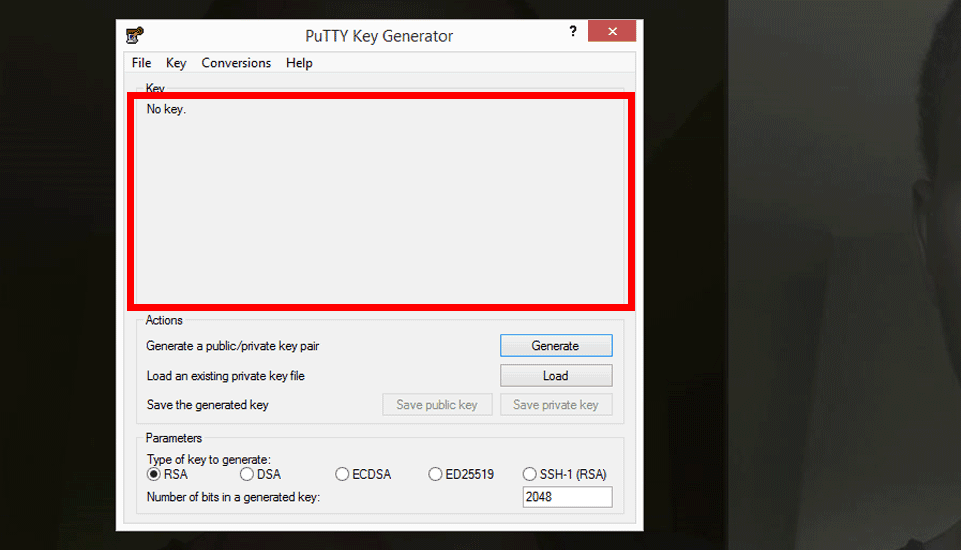
Once PuTTygen is opened, click generate and Keep moving your cursor in the area highlighted with the red box. Keep Moving the mouse randomly until the Key is fully generated.
For extra security, Add a Key Passphrase to your SSH keys.
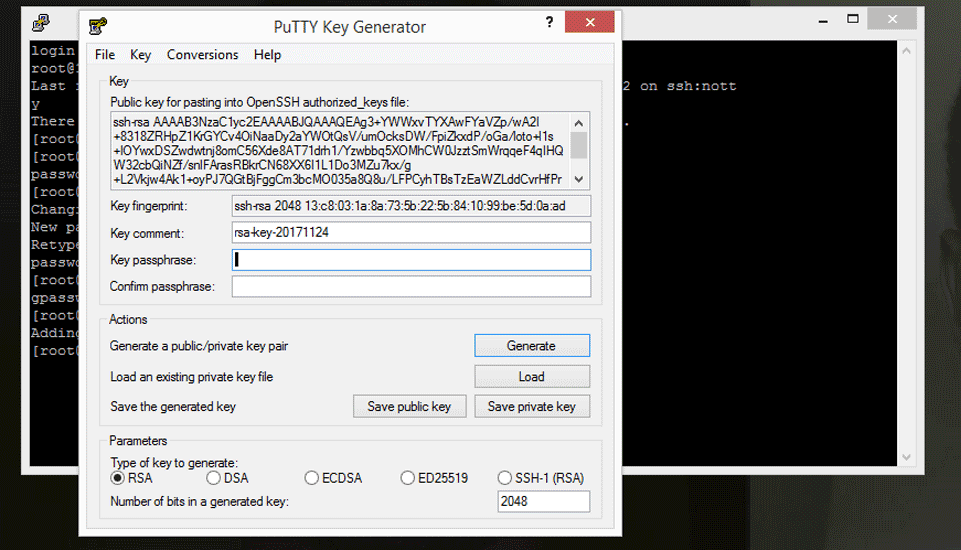
Then click , Save Private key. Store it in a secure area because without it you will not be able to log into your Server after we disable password and root login. Also ensure you can remember you Passphrase because there is no way to retrieve it.
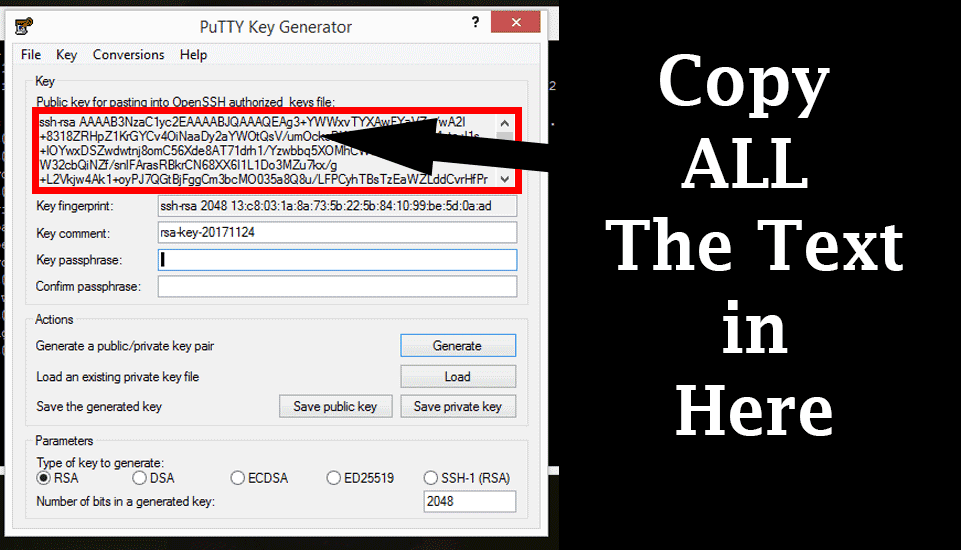
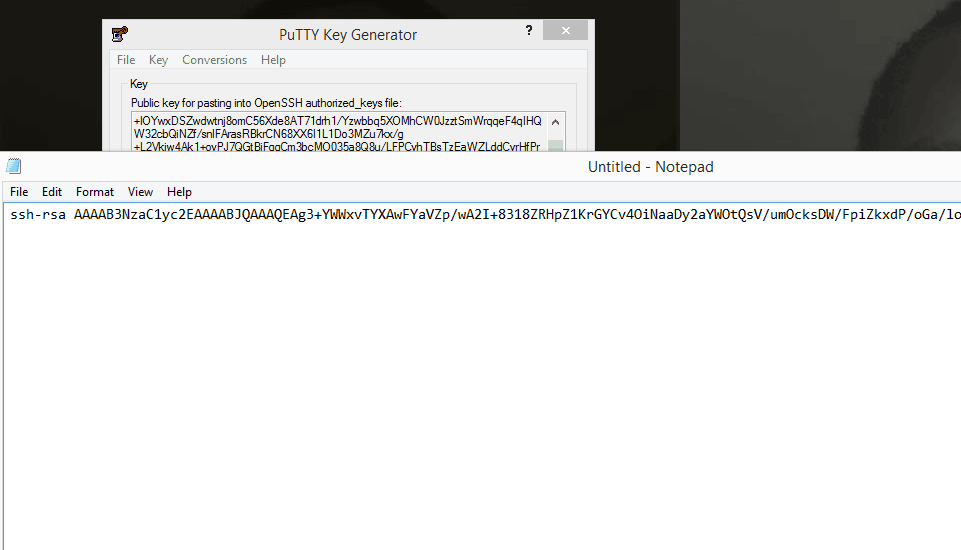
Don’t close puTTygen yet. Copy all the Text in the text box Under : Public Key for pasting into openSSH.. Copy it into a text editor because we’ll use it in a moment.
Ensure when you copy it, it is pasted in a straight line as follows . Save the file because you may need it in future.
Make a directory and copy SSH Keys for the new User (Still under Windows Solution Section)
First, open a new Putty Window because we need to log into our server again.
Open Putty, double click on your saved Session.
[ Important ] This time round we’ll use your newly created user, not the root user. Enter username as the new User you have just created.Enter the password you created for the new user.
You are now logged into your server.
Note that all commands will now be executed using sudo since you are not the root user. The first time you invoke sudo, you have to enter your password. This will be the password you did set for your new user here: passwd joe .
Make the directory and copy ssh keys into it
Paste the below into your command window. This will create the directory and then the second will open it in a command editor called nano . You will then be able to paste your public SSH key in there.
sudo mkdir ~/.ssh;
sudo nano ~/.ssh/authorized_keys
Nano is going to open up authorized_keys. Copy the public key you saved from puttygen .
Right click to paste. Ensure it is copied in a straight line. In one line that is.
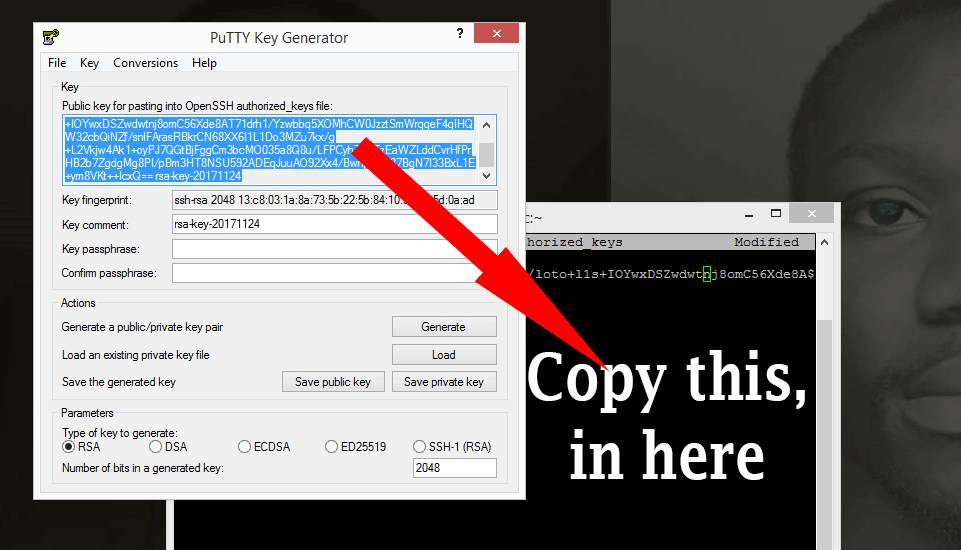
Then press CTRL X to exit. Then Y to accept changes. Then press enter.
Change Access Levels for the SSH Folder and SSH Key File
Now let us change the permissions for the folder and the public Key Enter the commands below.
sudo chmod 700 -R ~/.ssh
Then…
sudo chmod 600 ~/.ssh/authorized_keys
Then change ownership to your new user’s Folder …
sudo chown -R joe:joe /home/joe
In the above (that is, sudo chown -R joe:joe /home/joe ), change all instances of joe to the non-root user you created.
Confirm you can log in via SSH with the non-root user
You will need to confirm that you can login into your Server via SSH. This is because in the steps below you will disable password login. You don’t want to get locked out. First enure your non-root user can login via SSH only.
Let us login via PuTTy . Add the Hostname or IP. Use your IP from your Vultr Dashboard.
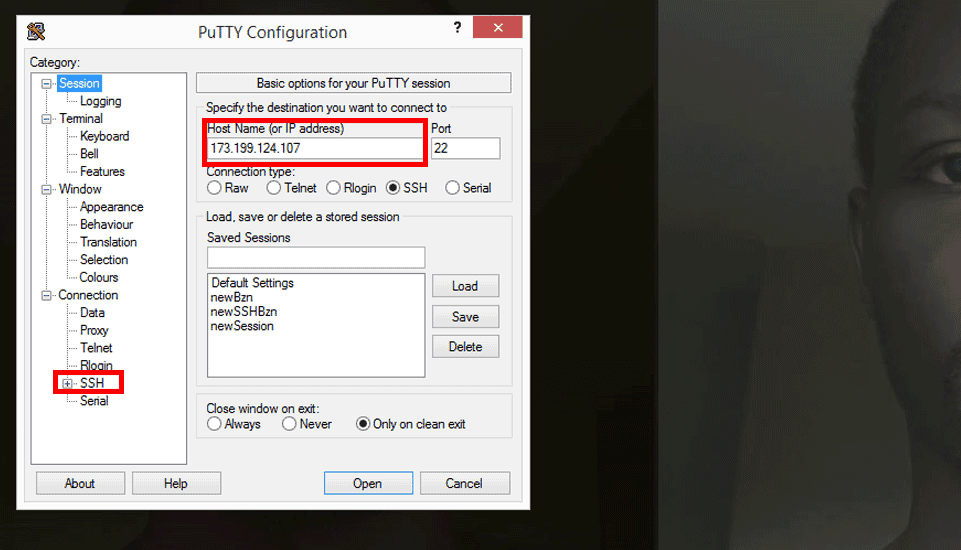
Then ,all the way down at the bottom you will see SSH.
Expand it then click on AUTH.
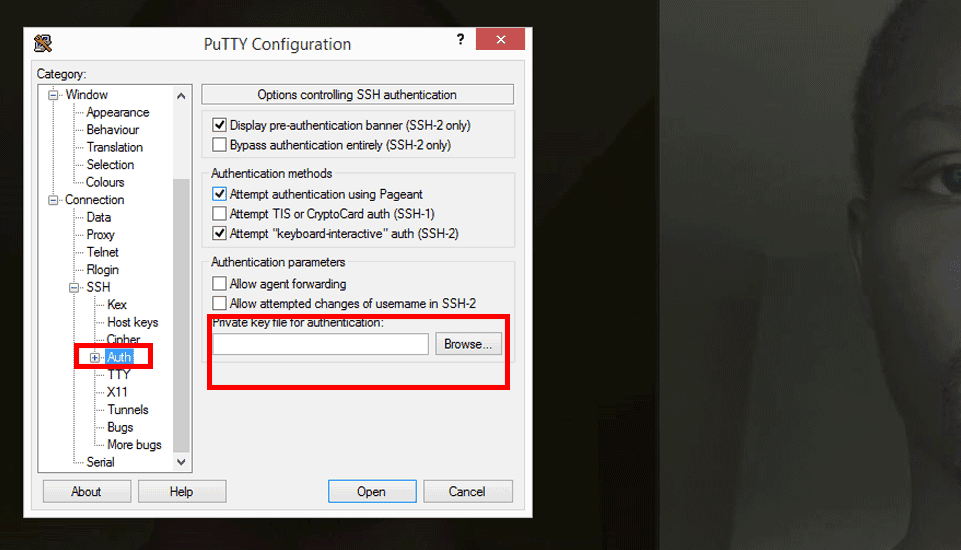
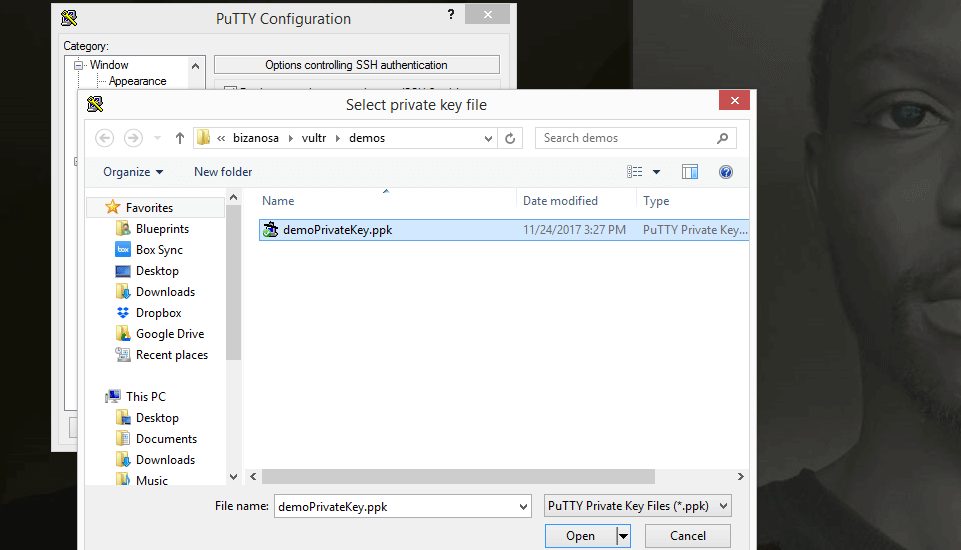
Then click on Browse and browse to the location of your private key. It is stored as .ppk.
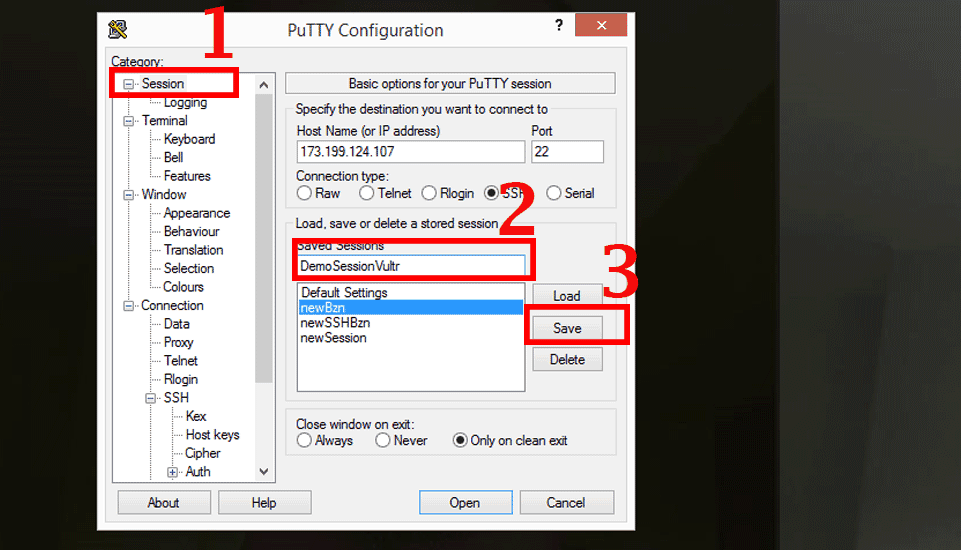
Let us save this session so that we don’t have to do this every single time we want to log in. Scroll up to Click on session. Under Saved sessions, give it a name and click save.
To log in…. Now that you have saved your session, login will be as follows:
Double click on the new session you have just created. Then log in as the user you created, the non-root user.
If you added a Passphrase for your SSH key, then type it in.
If you log in successfully then the SSH has been setup correctly for your non-root user . Hence you can now disable the root user login and you can also disable password login into your server. All these will be covered below.
##########
That’s it for the Windows Solution Section.
You may continue on with the Vultr Guide below. Continue from step 2.
##########
After the key has been installed, log into the server using the new user account.
ssh -l joe server-ip-address
If the login is successful, you may close the other terminal. From now on, all commands will be preceded with sudo.
Step 2: Disallow Root Login and Password Authentication
Since you can now log in as a standard user using SSH keys, a good security practice is to configure SSH so that the root login and password authentication are both disallowed. Both settings have to be configured in the SSH daemon’s configuration file. So, open it using nano.
sudo nano /etc/ssh/sshd_config
Look for the PermitRootLogin line, uncomment it (remove the #) and set the value to no.
PermitRootLogin no
Do the same for the PasswordAuthentication line, which should be uncommented already:
PasswordAuthentication no
Save and close the file. (CTRL X to exit and then Y to confirm changes . And then enter) To apply the new settings, reload SSH.
sudo systemctl reload sshd
Step 3: Configure the Time Zone
By default, the time on the server is given in UTC. It is best to configure it to show the local time zone. To accomplish that, locate the zone file of your country/geographical area in the /usr/share/zoneinfo directory and create a symbolic link from it to the /etc/localtime directory. For example, if you’re in the eastern part of the US, you’ll create the symbolic link using:
sudo ln -sf /usr/share/zoneinfo/US/Eastern /etc/localtime
Where it says, US/Eastern. Just use Your continent /your capital City. Saved me a lot of time trying to figure out my timezone.
Eg , I used : sudo ln -sf /usr/share/zoneinfo/Africa/Nairobi /etc/localtime . Try it with any location eg Europe/London , Australia/Canberra etc.
Afterwards, verify that the time is now given in localtime by running the date command.
date
The output should be similar to:
Tue Nov 28 15:35:34 EAT 2017
The EAT in the output confirms that it’s localtime.
Step 4: Enable the IPTables Firewall
By default, the active firewall application on a newly activated CentOS 7 server is FirewallD. Though it is a good replacement for IPTables, many security applications still do not have support for it. So if you’ll be using any of those applications, like OSSEC HIDS, it’s best to disable/uninstall FirewallD.
Let’s start by disabling/uninstalling FirewallD:
sudo yum remove -y firewalld
Now, let’s install/activate IPTables.
sudo yum install -y iptables-services

sudo systemctl start iptables
Configure IPTables to start automatically at boot time.
sudo systemctl enable iptables
IPTables on CentOS 7 comes with a default set of rules, which you can view with the following command.
sudo iptables -L -n
The output will resemble:
Chain INPUT (policy ACCEPT)
target     prot opt source               destination
ACCEPT     all  --  0.0.0.0/0            0.0.0.0/0            state RELATED,ESTABLISHED
ACCEPT     icmp --  0.0.0.0/0            0.0.0.0/0
ACCEPT     all  --  0.0.0.0/0            0.0.0.0/0
ACCEPT     tcp  --  0.0.0.0/0            0.0.0.0/0            state NEW tcp dpt:22
REJECT     all  --  0.0.0.0/0            0.0.0.0/0            reject-with icmp-host-prohibited

Chain FORWARD (policy ACCEPT)
target     prot opt source               destination
REJECT     all  --  0.0.0.0/0            0.0.0.0/0            reject-with icmp-host-prohibited

Chain OUTPUT (policy ACCEPT)
target     prot opt source               destination
You can see that one of those rules allows SSH traffic, so your SSH session is safe.
Because those rules are runtime rules and will be lost on reboot, it’s best to save them to a file using:
sudo /usr/libexec/iptables/iptables.init save
That command will save the rules to the /etc/sysconfig/iptables file. You can edit the rules anytime by changing this file with your favorite text editor.
Step 5: Allow Additional Traffic Through the Firewall
Since you’ll most likely be going to use your new server to host some websites at some point, you’ll have to add new rules to the firewall to allow HTTP and HTTPS traffic. To accomplish that, open the IPTables file:
sudo nano /etc/sysconfig/iptables
Just after or before the SSH rule, add the rules for HTTP (port 80) and HTTPS (port 443) traffic, so that that portion of the file appears as shown in the code block below.
-A INPUT -p tcp -m state --state NEW -m tcp --dport 22 -j ACCEPT
-A INPUT -p tcp -m state --state NEW -m tcp --dport 80 -j ACCEPT
-A INPUT -p tcp -m state --state NEW -m tcp --dport 443 -j ACCEPT
-A INPUT -j REJECT --reject-with icmp-host-prohibited
Save and close the file, then reload IPTables.
sudo systemctl reload iptables
With the above step completed, your CentOS 7 server should now be reasonably secure and be ready for use in production.
The following section is optional :

Enable automatic security updates on CentOS 7 with yum-cron
yum-cron is a simple way to call yum commands from cron. It provides configuration to keep repository items up to date, and to check for, download, and apply updates.
Install yum-cron
sudo yum -y install yum-cron
Start yum-cron
sudo systemctl start yum-cron
Enable yum-cron
sudo systemctl enable yum-cron
Open the configuration file and edit it.
sudo nano /etc/yum/yum-cron.conf
Changes to make in the configuration file : Locate the following and edit them as follows
Edit From…
update_cmd = default
To…
update_cmd = security
Next Edit From…
apply_updates = no
To…
apply_updates = yes
To receive alerts about updates when they occur, change the following:
Edit from…
emit_via = stdio
To…:
emit_via = email
Then add an email to receive alerts for updates when they occur:
email_from = email_to =
Save and Exit.
Then Restart yum-cron
sudo systemctl restart yum-cron
That’s it for this guide. Follow through carefully. If you rush, you may have to destroy your server and start a fresh. If you need to run multiple websites and you need an easier way to manage them all, the option would be something like a Web Host Manager . Kinda like CPanel, but Cpanel is expensive. So I would suggest VestaCP which is free and open to all.
There are lots of tutorials about it on Google and even on YouTube. Feel free to check it out. Or any of it’s alternatives such as Webmin,Sentora, CentosWebpanel etc.
By the way, on Vultr, once you create your Server, you may want to destroy it to avoid being charged for it while you are not using it. If that is the case, you may create a snapshot of it before you destroy it. Then use the snapshot to launch a new server the next time you are deploying a new server.
To create a snapshot of your new server, navigate to the server management area for that server instance (Just by clicking on its name). Then click on Snapshots. Give the snapshot a name and Add snapshot. That’s it.
To restore the Snapshot, when you are deploying a new server, under Server Type, click on Snapshot, then choose the snapshot you created for your instance. Choose everything else in the same manner we did while we were deploying the CentOS 7 server. The only difference here is that, Instead of choosing a CentOS Server or an Ubuntu Server and so on, you will choose a snapshot. This will save you A lot of Server set up time.
Create a Digital Ocean Account.
Not sure if VPS is the way to go? Check out the Web Hosts I recommend.
Download Vultr Tutorial Setup PDF
1. Download Vultr Tutorial Setup PDF
2. How to create a Swap File in Centos 7


great post,but still complicated making a video tutorial will be better
also, I hope you make tutorial on vultr server using LEMP application and cyberduck or filezilla to upload website files that would be a great help
Here is the video for this https://youtu.be/YNio8O5_xwQ