Last updated on July 27th, 2022 at 06:13 am.
Setup Linux Server by first deploying a new VPS server on Vultr VPS or using Contabo VPS.
Here is a video tutorial for how to deploy a Linux server on Vultr.
Here is another tutorial for how to deploy your server on Contabo.
1 Deploy new VPS Server and login via Git Bash : 00:00
Step one, deploy a VPS server. Use any of these recommended VPS providers. Then follow the next steps to setup your server. In this setup, I have installed Debian 10 on my server. Use that to follow along .
After setting up your server, download Git bash from Git – Downloads (git-scm.com) . Download and install the full Git. Then open Git Bash.
Log into your server. The details to login will be sent to your email or will be shown on your VPS admin dashboard. In the following, you are logging in as root.
Log into your VPS Server via SSH using Git Bash:
ssh root@server-ip-address
Enter your password and you will be logged in.
2 Create sudo user – Create new Linux admin user : 6:42
Next thing once your server is up and running, create a new user. You should not use the root user on your production server. Create a new user on Debian as follows:
adduser newus5r
Call your user anything you prefer. Mine is newus5r.
Then , add the user to sudo group as follows:
usermod -aG sudo newus5r
NOTE : If you experience an error whereby sudo is not available, add it:.
Update your server:
apt update && apt upgrade
Install sudo
apt install sudo
Restart your server. You can do this via the admin dashboard of your VPS provider or by running :
shutdown -r
or
reboot
Log in as the new user because all the next steps must be completed as the new user. You will need to use sudo before each command.
Related : Ubuntu 22.04 Initial Server setup
3 Setup SSH Authentication using Git Bash : 12:33
On windows the home directory for Git Bash is your user’s home directory. On Windows, go to Local Disk C, then Users, then your username. That is your Home directory.
In your home directory, check if .ssh folder is available. If you cannot see it, then enable hidden files and folders under the view settings of File Explorer. If you still can’t see it, then create it.
Inside of the .ssh folder create another folder. I’ll call mine , Debian10Server. This is where I will store my generated SSH key pairs.
Note : The tilde’ (~) represents your home directory. Instead of typing the full path of your home directory, just use ~ .
Our SSH key pair will be stored in this path : ~/.ssh/Debian10Server .
Generate the SSH key Pair
This part is done on your local computer. NOT on the server. Open a new isnatnce of Git Bash and run the following in order to generate the Ssh keys:
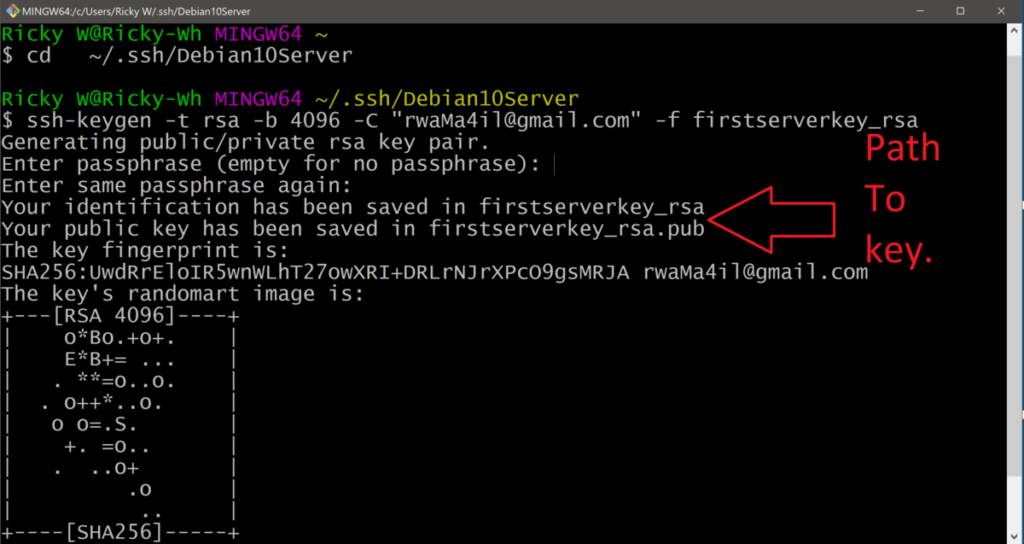
ssh-keygen -t rsa -b 4096 -C "" -f ~/.ssh/Debian10Server/firstserverkey_rsa
The keys will be named firstserverkey_rsa, that is firstserverkey_rsa.pub for the public key and firstserverkey_rsa for the private key. You can change the names.
Once you run the command above, Enter a passphrase for your key. A passphrase is a password for your key. You must add one to secure your private key even further.
Our SSH Key pair is now available in this folder : ~/.ssh/Debian10Server .
-b specifies the bits to be generated, in this case 4096 bits
-C is just a comment for the key. Add a comment for the key. Read more about SSH options here.
Add the public SSH key to Linux server
Still being done on the local computer. This is done as follows :
ssh-copy-id -i ~/path-to-public-key user@host
For instance we can add our public ssh key above as follows:
ssh-copy-id -i ~/.ssh/Debian10Server/firstserverkey_rsa.pub [email protected]
Note: The public key is the one with a .pub extension.
Change permissions for .ssh and authorized_keys
This part is done on the server.
In a Git bash Window, log into your server as the new user you created. Just log in with your Server’s password and username.
The .ssh folder is on your Linux server. Inside it there is an authorized_keys file. Inside of this authorized-key file is where your public keys are.
We will change the permissions for .ssh folder and the default authorized_keys file using the following command:
sudo chmod 700 -R ~/.ssh && sudo chmod 600 ~/.ssh/authorized_keys
Then change ownership to your new user’s Folder. Do this if you are adding ssh keys for another user who isn’t root. In the following command, change all instances of joe with the username you are adding the key for.
sudo chown -R joe:joe /home/joe
Test our SSH Authentication login
This is how to log in using your SSH keys.
Logging in via SSH key.
To log in via SSH, this time round you have to add the path of your key:
ssh user@server_ip -i ~/.ssh/path-to-private-key
eg
ssh [email protected] -i ~/.ssh/Debian10Server/firstserverkey_rsa
The -i option , enables you to choose an identity file to be used to log in.
If you are having any problems, just follow along using the SSH Key setup section of the video.
Disable Root login and Password Authentication after Setting up SSH Authentication using Git bash
After logging in successfully, disable root login and password authentication.
Open the SSH configuration file using the Nano editor:
sudo nano /etc/ssh/sshd_config
Look for the PermitRootLogin line, uncomment it (remove the #) and set the value to no.
PermitRootLogin no
Do the same for the PasswordAuthentication line:
PasswordAuthentication no
Save and close the file. (CTRL X to exit and then Y to confirm changes . And then enter) To apply the new settings, reload SSH.
On Centos:
sudo systemctl reload sshd
Debian / ubuntu:
sudo service ssh restart
systemctl restart ssh
That is how to Setup SSH Authentication using Git bash on Windows.
If you experience any errors feel free to leave a comment. I will help you get it right.
4 Create a swap file in Debian 10 : 33:20
Add Swap File – Debian 10 Buster
If you are on a VPS, you should definitely create a Swap file to compliment your RAM. When your system runs out of memory to use, it will use your swap file. This is convenient, especially nowadays since VPS providers use SSDs.
You can check if your Debian install already has a Swap location. You can still create another swap file even if it already does. To check swap availability run;
Read the important note below.
sudo swapon – show
Important Note: My website is stripping out double hyphens, so type in the command as shown in the screenshot below:

Let’s create our Swap File.
Step 1 : Create an actual file to be used for swapping.
sudo fallocate -l 2G /myswapfile
I’ve named mine myswapfile. You can name it whatever you like. I’ve allocated 2 Gigs to it. At least twice the size of your current RAM is ok.
Step 2 : Change the permission of the file to root user level.
sudo chmod 600 /myswapfile
Step 3 : Actually making that file (myswapfile), a swap file and then activating it. In linux use && to join two commands. First part makes it a swap , second part activates it.
sudo mkswap /myswapfile && sudo swapon /myswapfile
Step 4 : Add it to the /etc/fstab so that the system can register it as memory file every time the system restarts. Just copy and paste it into last line in /etc/fstab . Rename the file appropriately.
Open up /etc/fstab using nano
sudo nano /etc/fstab
Add the file in the last line as follows
/myswapfile swap swap defaults 0 0
Step 5 : Is my swap active?
Check available swap files :
Read the important note below.
sudo swapon – show
Important Note: My website is stripping out double hyphens, so type in the command as shown in the screenshot below:
Check the free memory on your system. The swap file should be included in the list too.
sudo free -h
That is how to create a Debian 10 Swap file.


