Last updated on July 11th, 2020 at 08:33 am.

Video Transcript
Hi and welcome to this video. In this video we’re going to see how to install jdk on windows.
And also how to install intellij idea on windows.
Download and Install JDK
The first thing we need to install is JDK , the java development kit . To install JDK. Go to Google and search for download jdk .

Click on the download result from Oracle, which says downloads oracle technology network . Click on that.
And then you’ll end up on the jdk download page. This page will show you the latest jdk . I will download version 13 which is the latest. Choose the version you want to download .
Click to download it,
And then accept the terms and conditions .
Based on your system, choose the correct version to download. I’m on windows 64 bit so i will just choose that one.
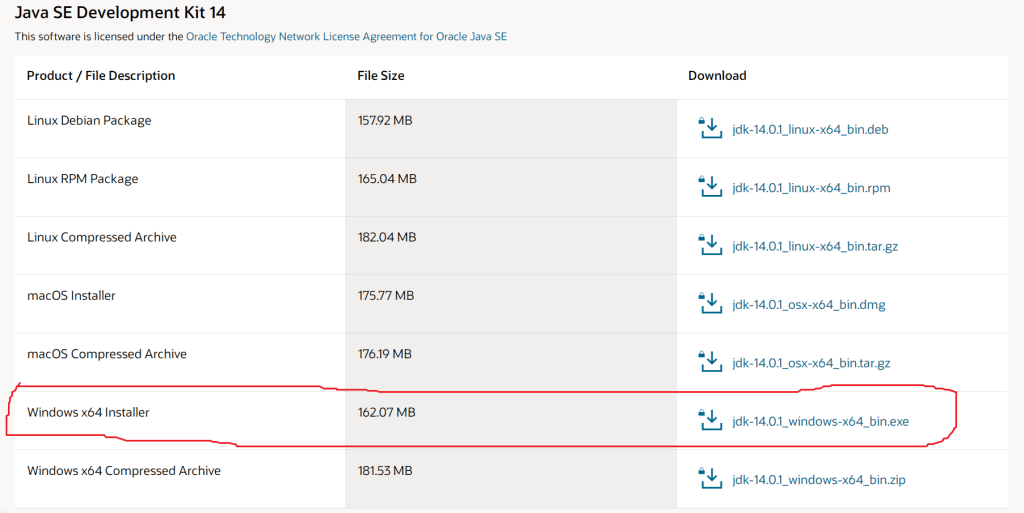
Click the download link for the JDK version you chose.
Go ahead and download it after accepting the terms and conditions..

I’ve already downloaded mine.So let’s just go and install it .
Find the downloaded file and then double click on it. Please note that I’m on windows 8.1 and if you are on windows 10, you can still do the same things I do on my Windows 8.1.
Click next till the installation completes. Once the installation is complete, click on close.
Add JDK Path to Windows variables
The next process is to add the JDK path to your Windows System variables. You need to add jdk to your path variables on windows .
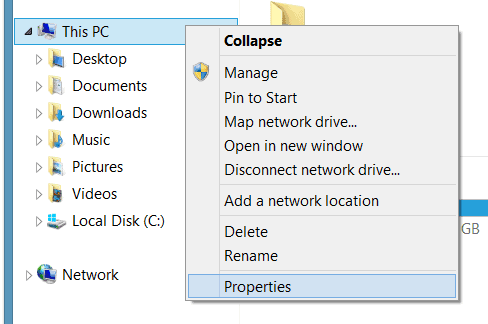
Come into your Windows explorer then go to This PC. If you’re in windows 8.1 you can follow along with me.

If you’re in windows 10. This PC is referred to as My PC.
Right click on My PC / This PC.
Then go to properties .
Then click on Advanced system settings.
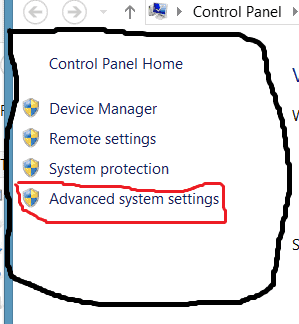
And then under advanced, click on environment variables .
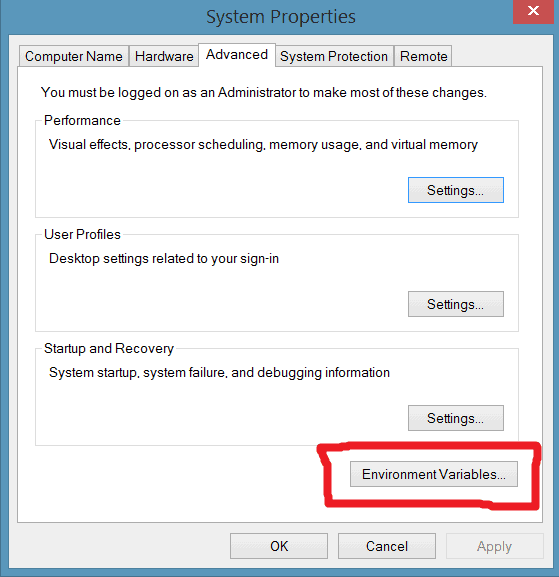
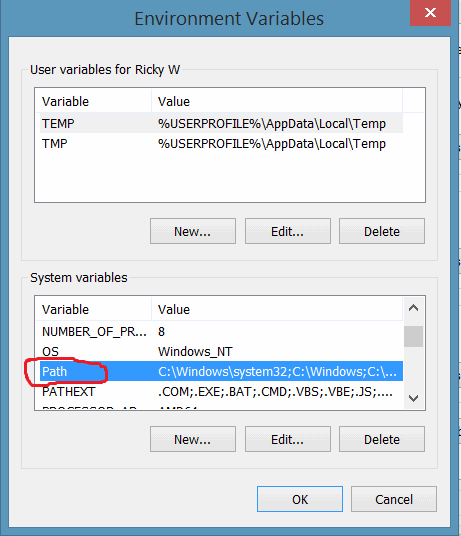
And then where we have system variables. Just scroll down until you find path. Double click on path under System variables.
You are looking for path, shown in the diagram below. Double click on path .
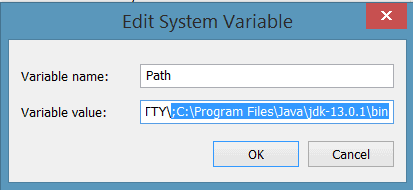
You’ll need to add the JDK path variable .
You need to add the path to where the java development kit is installed on your Windows PC.
Just scroll to the end of the line. And at the end of the line add the path to your jdk bin directory. If you dont know your JDK bin’s path, read the section below.
Add the JDK path as illustrated in the diagram below.
Then click ok to save the path.
Where is my JDK path?
Here is how to find out where jdk was installed.
Go inside of the local disk where your programs are installed.
If you are on a 64-bit computer , you’ll go under program files.
If you’re on a 32-bit you’ll go to the program files on your x86 machine.
Look for the java folder. Normally found in C:\Program Files\Java .
Inside the java Folder, find the folder that starts with java-##, for example it could be named , jdk-13.0.1 , meaning you have version 13 installed.
Go inside this JDK folder.
Then go into the Bin folder .
While inside the java Bin folder, copy the path to your bin folder from your windows path URL.

Copy the path and then go back to your system variables window.
And at the end of the line, add a semicolon and then add the path.
Once you add the semicolon just paste in the path.
You can add another semicolon so that in future if you need to add any other variables, you can just add them without adding the semicolon.
Then click ok to save the path.
Confirm the JDK Path is working
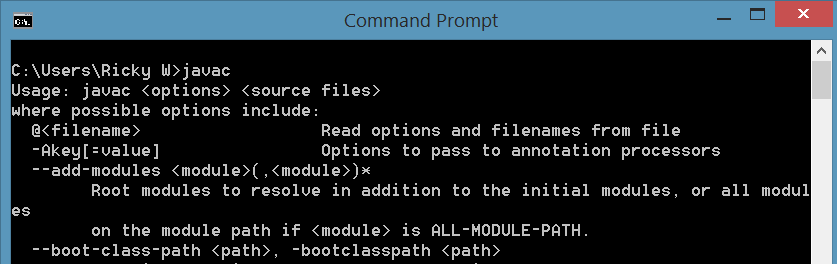
Open up the Command prompt on your computer.
Type in javac . if you see a bunch of help text about javac, then JDK path is being recognized.
Check the java version by typing java -verion. if you get the version back, JDK is installed and you can start installing Intellij.
Install Intellij IDEA on Windows
IntelliJ IDEA is an integrated development environment (IDE) written in Java for developing computer programs. It is developed by JetBrains.
Intellij is provided for use as an Apache 2 Licensed community edition, which is free to use. There is also a paid version which is intended for companies that require various commercial features in the proprietary commercial edition.
You can use either version. However we are going to install the community edition which is free.
To download intellij, Go to Google and search for Download Intellij. Then click on Download Intellij IDEA. Download it from jetbrains.com/idea/download/ , nowhere else.
Then download the community edition and install it on your Windows PC. It is a straight forward process that should not give you any challenges.

We’ll continue from here when we start learning how to write some Kotlin code.
")


