Last updated on May 27th, 2022 at 05:29 pm.
How to change Namecheap Nameservers and edit DNS records
In this post let’s see how to change Namecheap nameservers and edit DNS records. For instance, if you want to use Cloudflare, you must change your Nameservers on Namecheap.
Nameservers vs DNS
First of all, what is the difference between Namecheap Nameservers and Namecheap DNS?
Nameservers are added on your domain to point to where your DNS records are handled. On the Nameserver the DNS management system is installed. The DNS management system is responsible for handling your DNS redirects.
It simply points to which server or system will handle the DNS redirects for your domain name. It simply shows the corresponding server where your Website can be found.
DNS on the other hand, are the actual details that will guide web visitors to the correct server where they will be shown your website files. Without DNS records, if a visitor goes to your domain, they will see a can’t connect to the server error. DNS guides your browser request to the correct location of a website or sub-domain or email and so on.
DNS records also tell other servers where to redirect various traffic, such as email and so on. For email to be delivered you must add the correct records on your DNS zone editor.
How to change Namecheap nameservers
Follow the following steps to change Namecheap Nameservers.
Step 1 : Log in
Go to Namecheap.com and log into your account.
Step 2 : Go manage your domain.
In your dashboard, click on the Domain List to view all your domains.
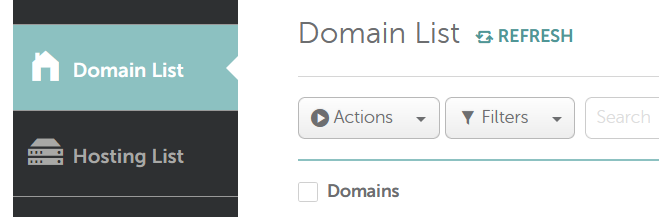
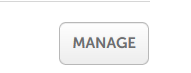
Next to the domain you want to manage, click on the Manage button.
Step 3 : Scroll and edit Nameservers
Scroll down to the Nameserver section and then edit them appropriately.
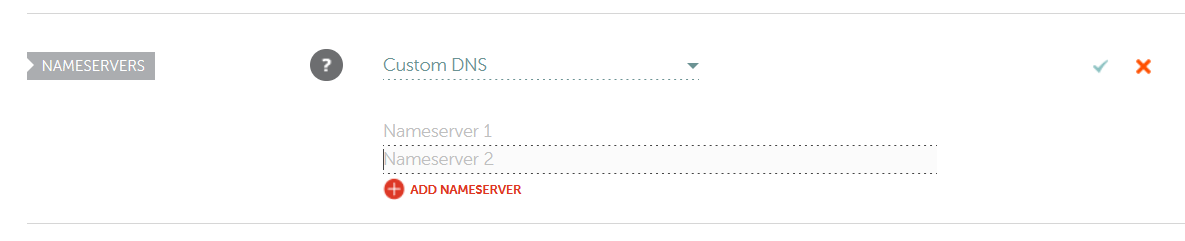
There are 3 different nameserver options as shown in the screenshot below.
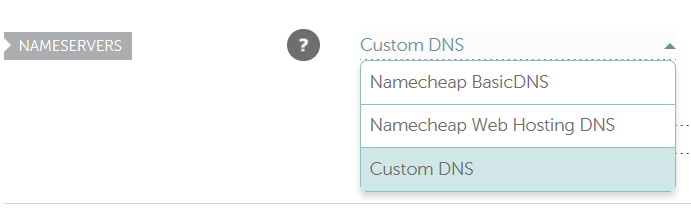
The different Nameserver options are explained below:
Namecheap Basic DNS : This is the default DNS that your namecheap domain comes with upon purchase. When you buy a domain on Namecheap.com, this is the Nameserver setting that will be provided by default. If you buy EasyWP hosting and you;d like to use a particular domain for it, choose this option.
Namecheap Web Hosting DNS : If you have bought Namecheap shared hosting choose this option for your domain.
Custom DNS : Choose this option if you are using your own Nameservers or other third party Nameservers. If you are using cloudflare choose this option then enter the Nameservers then save.
Step 4 Save
Once you have changed the Namservers to custom name servers or any other Namecheap nameservers, then save,
Click on the green checkmark to save or click on X to undo change.

That is how to change your Nameservers. Next, let us see how to edit your DNS records.
How to edit Namecheap DNS Records
If you use Namecheap Basic DNS or Namecheap Web Hosting DNS, then you can use the Name Cheap DNS system for your domain. Otherwise any changes you make here will be in vain.
Step 1 : Go to DNS zone
Go to Domain List .
On the domain you want to edit, click manage .
On the domain management page click on Advanced DNS .
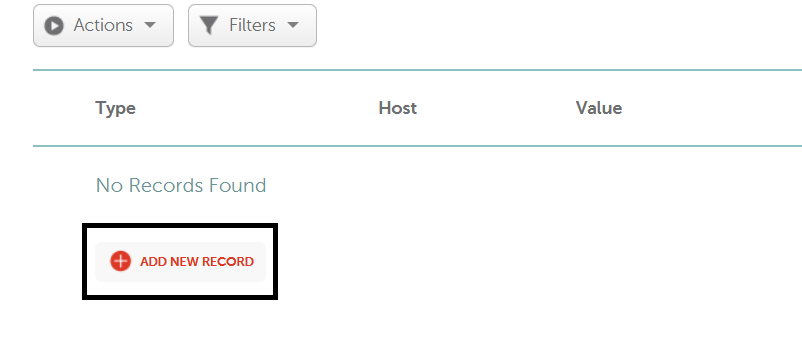
Step 2 : Add record and save
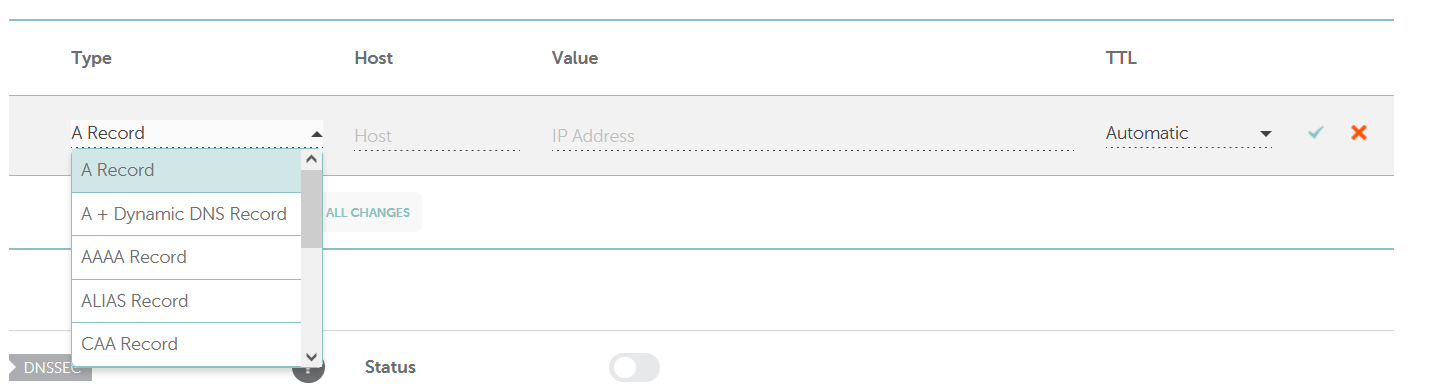
Click on the Add record button. Enter all the options you need for your record.
Choose the record type (A record, CNAME, TXT etc).
Enter the host (also called name ).
Then enter the value.
Then choose TTL (Time To Life) – Automatic is okay.
Then save with the green checkmark.
That’s it. If you’re stuck at any point, feel free to watch the short Namecheap video tutorial embedded above.
Video Captions for Namecheap Video
Hi and welcome. In this video let’s talk about how to change your Namecheap Nameservers.
If you want to change your Name server, of course, first of all you need to go into the domain that you want to change. Just come here under the Domains list and search for the domain that you want to change.
Search for the domain that you want to change its name-servers. For instance, let’s say I want to change the name servers for this. I’m just going to click there on manage.
I will just scroll down and here under Nameservers, you can change the name servers for your domain right there. If you want to use the Namecheap name servers, you can use that. If you have web hosting from Namecheap or you bought the Namecheap WordPress hosting which is one of the most affordable WordPress hosting available, you can just come here and choose Namecheap web hosting DNS.
Sometimes you may want to add custom domain nameservers. Custom name servers. Maybe these are name servers from Cloudflare. You will just come here and click Custom DNS and you can add the first Nameserver there.
Related : How to access Namecheap CPanel – 3 Ways
Just paste it in there. Paste in the first Name-server and then paste in the second name server. And if there’s a third one you can click add and then add the third name server.
Once you’re done you’ll just click there to save. Make sure you click there to save the nameservers. And give it time and it will propagate.
I’ll just go back to Namecheap Basic DNS. And then I will click there to save. That’s pretty much how to change the name servers for your Name cheap domain.
Also note that if you want to change the DNS zone, you can. Maybe you want to add certain DNS records. You may want to add CNames and so on. Just come here under advanced DNS and you can add different DNS records. Perhaps you want to add a cname or you want to remove a cname record.
You may have created a subdomain and you want to add a new record. You can just click there. Maybe I’ve created a subdomain. I can just click on A record. And then the host I can give it the name, maybe it is something like subdomain , sub d. And then add the IP address. I’ll put the ip address there and then the time to life, just put it as automatic.
Then you can save. Of course I can’t save because I haven’t added an IP address but if I add an IP address I can save.
In this video you’ve seen how to change the Namecheap Name servers. And also how you can add DNS records on Namecheap. If you want to add any dns records, maybe you have A records or CNAME records; the different types of records that you can add are all here. Right there. TXT records. All of them you can add here.
Let’s say you have certain details that you want to add about a certain TXT record, you can add it there. That’s the name and then the value for that txt record.
That’s pretty much it for this video. I hope this will help you to change the nameservers and also add any DNS records that you want to add for your domain. Once you’re done you can just go wherever you want to go. Maybe you want to go back and change the name servers, you can go back to the domain, then come down here and change the nameservers. That’s it for this video.


